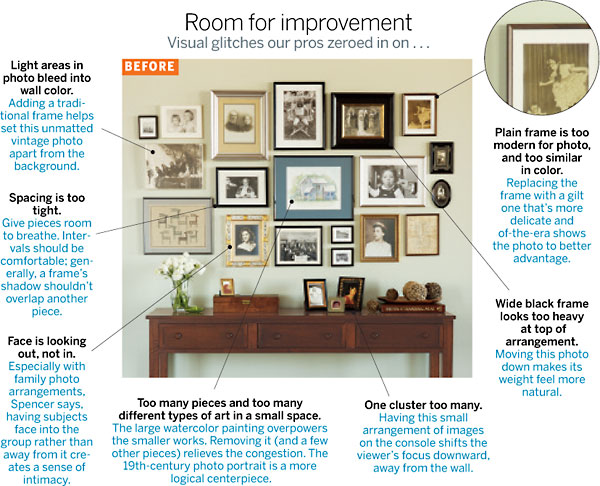
The prospect of hanging art is sometimes considered a scary one. Many otherwise brave people live for years with bare walls rather than make ill-considered holes in them. How to conquer this fear? We recently asked professional art installers Dann Witczak and Natasha Spencer (Spencer-Witczak, 773-752-0477, theartofinstallation.com) to improve an arrangement of family photos and tell us how they did it.
STEP ONE: Edit One of the most common mistakes people make, Witczak says, is to think, "I have it, so it should be out." Pare down. All of your art doesn’t need to be displayed all of the time. Put some pieces away and rotate them back in when you want a change.
Feel free to mix different types of art-framed needlework, a watercolor, an etching-with photos, but ask yourself if doing so strengthens the arrangement. If the answer is no, Witczak says, eliminate the piece that "jumps out."
 |
|
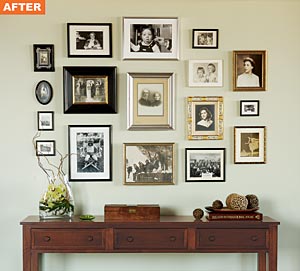
Organizing the artwork in columns, with vertical spaces running top to bottom, brings coherence to this arrangement of photos from different eras. |
STEP TWO: Assess Frames Are your pieces framed to best effect? You want the frame and the mat, if there is one, to draw the viewer’s eye into the artwork, not to distract from it. Frames of the same period as their photos (or reproductions that evoke it) generally work better than frames of an entirely different era and aesthetic.
Check the backs of the frames, too. Are they stable? Replace questionable hardware. Sturdy picture-hanging wire attached to "eyes" on both sides of the frame’s back puts less strain on the frame than a saw-toothed hanger nailed to the top. Small acrylic bumpers (available in hardware stores) applied to the lower corners help keep pictures from going askew.
STEP THREE: Choose Locations Set up more than one display area in your home-everything needn’t, and probably shouldn’t, share one wall. Try to avoid walls that receive significant amounts of direct sunlight.
Create groupings that make sense visually. Children’s artwork may work better in a space of its own, where new pieces can easily replace older ones. Contemporary color photos may look more at ease with their own kind than mixed into an arrangement of vintage pieces with muted tones.
Everything doesn’t need to be at eye level; you can, in some cases, hang art almost up to the ceiling. But if pieces are small or need to be seen close up to be appreciated, make sure they’re not too high or separated from the viewer by, say, a large piece of furniture.
STEP FOUR: Plan a Layout Lay the pieces on the floor and photograph different arrangements with a digital camera, then go with your favorite. Witczak often starts with the center piece or pieces of the arrangement and then works outward. "Typically, smaller pieces orbit the bigger ones," he says. "You’re looking for balance." Keep an eye out for clumps of sameness-you probably don’t want all the black frames on one side of the arrangement and all the silver ones on the other. Ditto for too many same-sized pieces in one area.
Measure the overall arrangement top to bottom and side to side to make sure it will work in the space; write down those dimensions. Also write down the distance from the top boundary to the top of an anchor piece, likely one in the middle of the arrangement, as well as the distance from one side boundary to the midpoint of the top of that piece.
In most layouts, the spaces between the frames need not be uniform, but they should be pleasing-neither too tight nor too gappy. While the pictures are still on the floor, note intervals ("two inches," for instance) on pieces of tape and stick them lightly to the frames on appropriate edges, to guide you later.
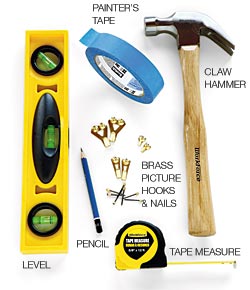 |
STEP FIVE: Hang the Artwork Use blue (painter’s) masking tape to define the area of the wall you want to use, based on the measurements you made on the floor. Use a level to make sure the lines are straight. Mark the midpoint of the area with tape to help keep you oriented.
Start with the anchor piece you chose in step four. Measure down from the top blue tape to where you want the top of the frame to be; put a piece of tape there. Measure in from the side tape to the mid-point of the anchor frame’s top (determined in step four); mark that point on the tape with a pencil. Measure the distance from the top of that frame to where the wire peaks in back when stretched taut. Mark the wall that same distance from the pencil mark, and nail in a hook. Brass hardware is best; two brands that Spencer and Witczak like are Floreat (available at Blick art-supply stores or dickblick.com) and Ook (Home Depot, Menard’s). Use a level to check your work.
Use your digital photo and interval measurements from step four to hang the rest of the artwork.
Photography: Tyllie Barbosa
styling: May boury franca
console: courtesy room & board
berlin vase, acacia tray, wicker balls: courtesy Crate & Barrel