Crafting holiday decorations is a time-honored tradition-who hasn’t fashioned reindeer out of candy canes and pipe cleaners?-but the recent do-it-yourself craze has upped the ante. To help you sharpen your skills, we asked three local craft whizzes for holiday project ideas and step-by-step instructions for making them.
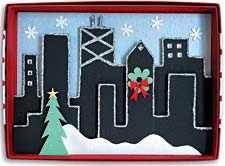 |
Card in a Box
Cost: $50 (initial cost for all supplies); $1 to $2 per card box.
Time: 1 to 3 hours
Source: Sue Lindstrom, founder and creative director of Paper Source, 232 West Chicago Avenue (plus four other locations)
Supplies:
1-inch-deep cardboard gift box with lid |
Heavy paper in silver, red, green, black, quartz, and gold
Decorative hole punches
Silver glitter
Glitter glue and glue stick
A variety of stickers: crystal, 3-D dots
Craft knife, blades, and scissors
Foam
Instructions:
-
Glue silver paper to the inside of the box bottom.
-
Cut out a skyline of your own design (make sure it fits in the box). For a 3-D effect, cut out a slightly smaller skyline and layer it, separating the layers with strategically placed pieces of foam. Consider creating a cityscape that mimics recipient’s city or block. Personalize with street signs, store names, and photos in building windows.
-
Trace the outline of the skyline with glue and apply glitter. Shake off the excess and let dry.
-
Add sparkly details, like the Xs on the Hancock building. Use a snowflake hole punch and quartz paper to make snowflakes. Use a seven-point-hole punch to make a wreath. Cut out a tree and star. Glue them on.
-
Cut a two-inch-wide band of thick wrapping paper to go around the outside of the box lid and affix with glue. Make a paper mailing label and embellish with glitter.
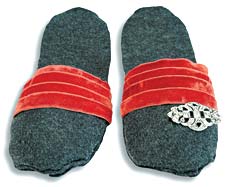 |
No-Sew Slippers
Cost: $15 to $20 a pair.
Time: 1 hour
Source: Aimee Dolby, a co-designer for the local accessories craft outfit Sugarpunch (www.sugarpunch.com).
Supplies:
Fabric glue (Dolby recommends “Unique Stitch” brand adhesive)
1/4 yard nonskid slipper sole material
Felt, flannel, wool, or other heavyweight fabric
1/4 yard fusible heavyweight interfacing
Clothespins
Pair of air-foam insoles
Cardboard
Velvet ribbon
Instructions:
- Trace foot on paper. Round out the toe and heel and add 1/2 inch to the outline; then, so the slippers can be interchangeable, don’t give the foot shape a curve. Cut.
- For the bottom pieces, use the template to cut four pieces of fabric, two pieces of nonskid material, and two pieces of cardboard.
- From the bottom up, layer and glue one fabric piece, a piece of cardboard, one of the air-foam insoles, and a second piece of fabric.
- For the tops, make a copy of the foot template from the original and add 1 1/2 inches to the outline. Measure a third of the way down the foot from the top of the toe; then draw a straight line across. Cut. Use this new template to cut two pieces of fabric and two pieces of interfacing.
- Iron the interfacing to insides of the slipper tops, following the manufacturer’s instructions.
- Along the edges, glue top and bottom pieces-the sides that you want on the inside of the slipper facing each other-and use clothespins to keep the fabric in place as it dries. Let dry at least 30 minutes before carefully turning the pieces right side out.
- Attach the ribbon, gluing the strips in an overlapping pattern and the ends to the underside of the slipper. Glue nonskid material to the slipper bottoms, bumps facing out.
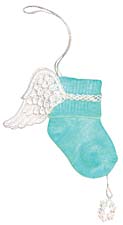 |
Baby Sock Ornament
Cost: $3 each.
Time: 15 to 30 minutes
Source: The former owner of Woodstock’s Red Barn Art School, Melissa Hirst Tierney, who now co-designs clothing for her company, melissa/brit.
Supplies:
Pair of plain white baby socks
McCormick Neon food coloring and salt
Pair of angel wing appliqués (available at any fabric store)
Ribbon
Package of snowflakes on cords
Fabric glue (or glue gun)
Instructions:
- Dye your socks following the egg-coloring directions on package. They will be very dark. For lighter shades, use half the recommended drops. Add 1/4 teaspoon salt to set the dye, and, if working with kids, use hot water instead of boiling. Squeeze gently and hang to dry.
- Cut a piece of ribbon long enough to overlap around the sock top and attach the ribbon with glue.
- Cut a six-inch-long ribbon for the ornament’s hanger. Fold ribbon in half and, with glue, attach the looped ribbon to the inside of the sock, near the top of the opening. Press to seal.
- Glue on wings and snowflake; you may also personalize with a metallic liquid pen or fill the sock with herbs before gluing it shut, so it can double as a sachet.