 |
RELATED ARTICLES
Buy a camera
Organize, edit and share photos
What happens when you challenge a professional photographer to a point-and-shoot-off? You lose-decisively. But there are useful tips to be gathered along the way. On a recent overcast morning, Alex Garcia, a veteran photographer for the Chicago Tribune, played tourist with senior editor Jennifer Tanaka, each taking snapshots with her 3.2-megapixel Canon PowerShot A70 digital camera set to “auto.” The results-and Garcia’s pointers on how to avoid common mistakes.
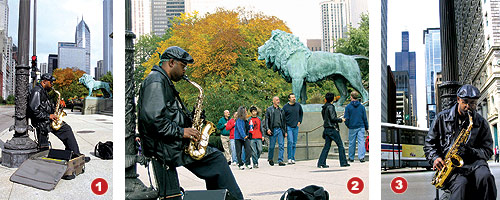 |
1. Jennifer’s Best Try
She says: “I thought about taking a close-up picture of this street musician but went with a side view in order to capture a city-ish scene. So my picture includes one of the Art Institute’s lions and a slice of Michigan Avenue.” [Sidenote: The musician’s name is Traysee Leonard, 45. He is playing an alto saxophone-very well, we thought-in front of the Art Institute of Chicago.]
2. Alex’s Improved Shot #1
He says: “If you just wanted to get a street performer in his element-with the light pole, suitcase, pedestrians, et cetera-Jennifer’s shot does a good job. I chose to get a little closer to the musician so that you can see him better while still placing him in Chicago. I sat on the sidewalk and waited for some people in colorful clothing to pass between him and the lion.”
3. Alex’s Improved Shot #2
He says: “This picture takes the musician ambiance a bit further by eliminating pedestrian onlookers and creating more of a mood. Again, I sat on the sidewalk for this picture, but this time directly in front of him for a view down Adams Street. The bus turning at the intersection eliminates some of the street chaos and you catch a glimpse of the Sears Tower.”
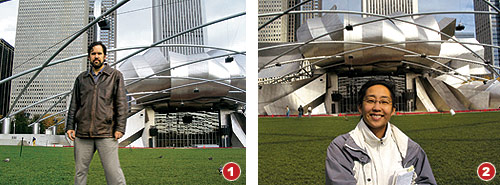 |
1. Jennifer’s Best Try
She says: “I tried to frame Alex in an interesting way, placing him off to the side. I was also conscious of the fact that the Aon Building rises from behind the bandshell like a tree from behind someone’s head. But the result was, depressingly, all too familiar: Alex is chopped off at the knees and the Gehry bandshell is partially blocked. In my defense, I took only two pictures whereas Alex shot about 12.”
2. Alex’s Improved Shot
He says: “In general, you probably wouldn’t want to have the Gehry wrapping around a person’s head like a helmet. But, if it’s a pal, the effect could be a funny or quirky way of making a picture that brings the two elements together. I made Jennifer bigger by standing closer to her and moved toward the bandshell so that the glass stage curtain frames her face nicely.”
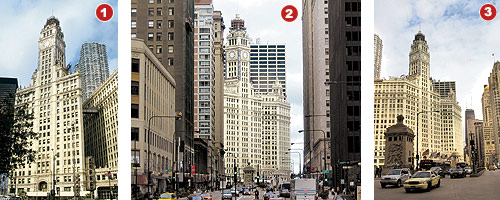 |
1. Jennifer’s Best Try
She says: “When it comes to photographing architecture, my instinct is to isolate a building. In this case, I stood in the plaza across the street to get as much of the Wrigley Building into the frame as I could but I still managed to cut off the bottom and the side. I’m not happy with the inclusion of the black IBM Building on the left, which looks attached to the side of the Wrigley Building in a strange way.”
2. Alex’s Improved Shot #1
He says: “It’s not necessarily wrong to shoot a building’s mug shot, but I think in many cities it’s more interesting to see the building in its skyline context. I walked to Wacker Drive and took this picture from the traffic median. I like that you can see the bridge, some cars in the foreground, and the John Hancock in the distance. The Wrigley Building is lit by a ray of sunshine, which I waited for.”
3. Alex’s Improved Shot #2
He says: “This was taken from Randolph Street, looking north. What I found interesting was the contrast between the shadowy valley of buildings and the white Wrigley Building. I pointed the camera at the sky and pressed the shutter button halfway so that the camera’s light meter would take a reading more similar to the brightness of the building than the darkness of Michigan Avenue. I reframed my shot, then clicked.”
| What does that setting do? |
|
|